
When it comes to sketching, illustrating, or simply taking notes, the debate of Pencils vs Markers always comes up. Both tools are popular among artists, designers, and students — but they serve different purposes. In my experience, choosing between them depends more on your goal than on which one is “better.”
Let’s break it down clearly and practically.
Control & Precision
One of the most noticeable differences is the level of control and precision each tool provides. The way the tip interacts with the paper, along with how pressure affects the result, can significantly influence the drawing process and outcome.
✏️ Pencils
Pencils offer exceptional control. You can vary pressure to create soft transitions, deep shadows, or delicate details. Because graphite is erasable, pencils feel forgiving and flexible, ideal for developing proportions and refining ideas gradually.
Best for:
- Sketching outlines
- Technical drawings
- Realistic shading
- Practice and learning fundamentals
🖊️ Markers
Markers, on the other hand, encourage confidence. The ink flows consistently and creates bold, defined lines. However, once applied, the mark is permanent. This makes markers feel more decisive and intentional.
Best for:
- Clean line art
- Graphic illustration
- Poster-style artwork
- Bold color blocks
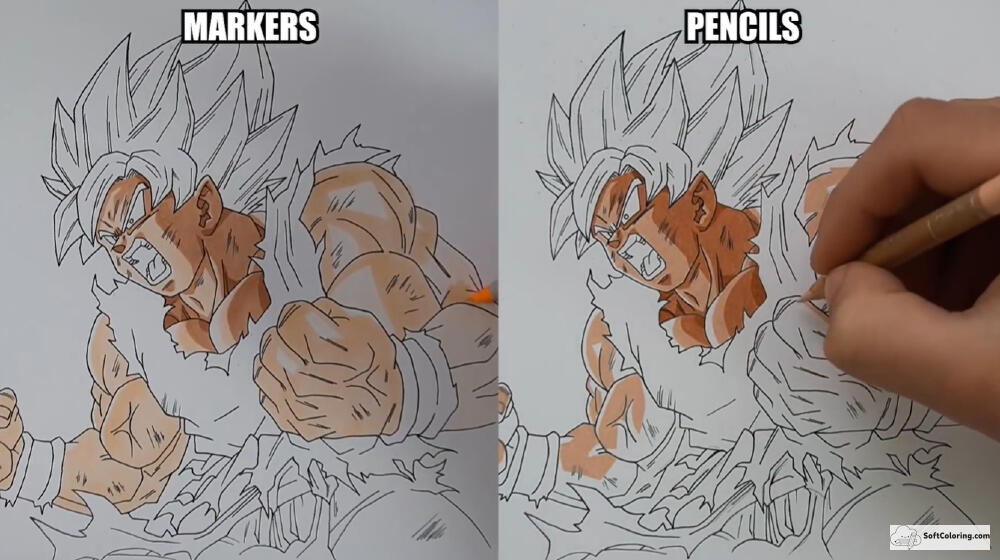
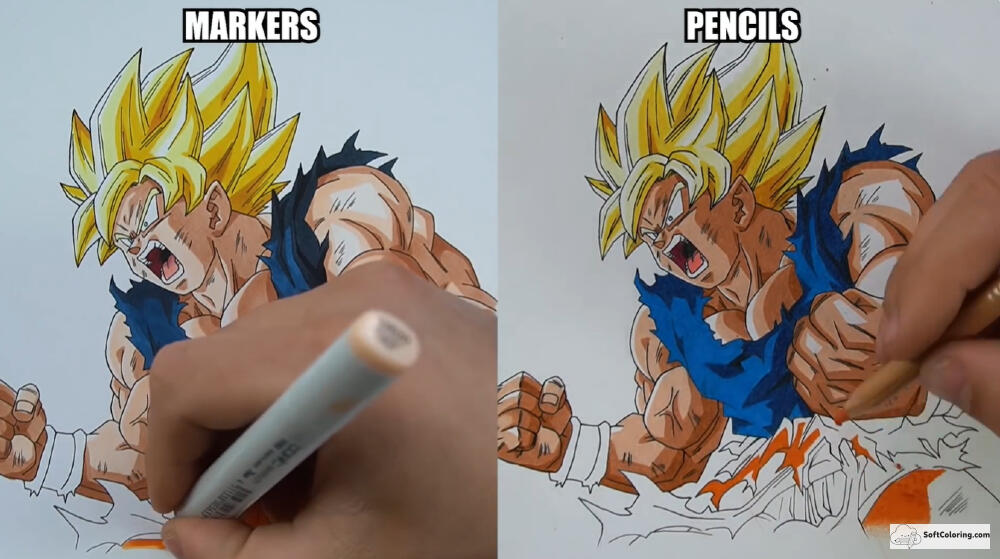
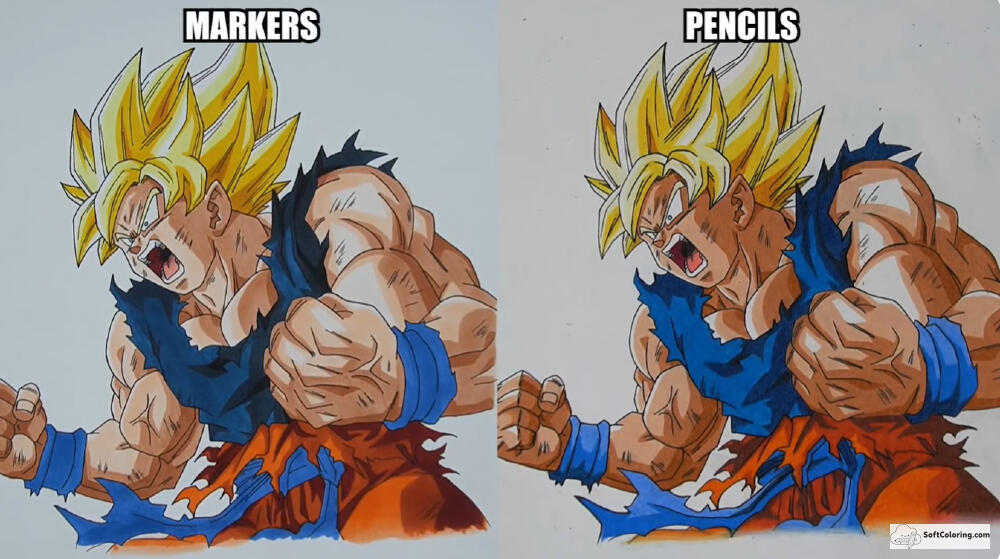
=> For detailed drafts and learning anatomy or perspective, pencils often feel safer. For clean line art and striking visuals, markers shine.
Color & Vibrancy
Color is another important factor when comparing pencils and markers. The way each tool delivers pigment, blends tones, and builds intensity can significantly affect the final look of an artwork.
✏️ Pencils
Standard graphite pencils don’t offer color, but colored pencils provide subtle, buildable layers. The finish is usually soft and textured.
Pros | Cons |
Easy to layer gradually Great for soft gradients Less risk of over-saturation | Takes time to build intensity Colors may look muted |
🖊️ Markers
Markers, especially alcohol-based ones, produce intense, vibrant color. Blending can be smooth and seamless when done correctly.
Pros | Cons |
Strong pigment Smooth blending Professional illustration look | Can bleed through paper Requires thicker paper Mistakes are harder to fix |
Texture & Surface Feel
Texture is an important aspect that affects how a drawing looks and feels. The surface result created by pencils and markers can give artwork a completely different visual style.
✏️ Pencils
Pencils interact with the paper’s surface (or “tooth”), which naturally creates a slightly grainy texture. This textured effect gives drawings a classic and organic appearance that many traditional artists appreciate. It also helps build depth through layered shading and subtle tonal transitions.
This quality makes pencils especially suitable for:
- Realistic portraits and detailed studies
- Soft shading and gradual tonal changes
- Traditional or sketch-style artwork
🖊️ Markers
Markers produce a very different surface effect. The ink spreads evenly across the paper, creating a smooth and flat finish with minimal visible texture. This clean look is often associated with modern illustration and graphic design.
Markers are particularly effective for:
- Bold color blocks and clean illustrations
- Comic art and animation styles
- Modern or graphic-style artwork
In simple terms, pencils tend to create a more textured and traditional look, while markers deliver a smoother and more contemporary visual style.
Workflow & Ease of Use
For beginners, pencils usually feel more approachable. You can sketch lightly, erase mistakes, and refine forms step by step. The learning curve feels gentle.
Markers demand more planning. Since corrections are limited, you need to think ahead before committing to lines and color blocks. However, once you gain confidence, markers can significantly speed up your process — especially when filling large areas of color.
Cost & Practical Considerations
Pencils are generally more affordable and long-lasting. They don’t dry out, and maintenance is minimal.
Markers, especially high-quality alcohol markers, can be more expensive. They require suitable paper to prevent bleeding and may dry out over time. However, the visual payoff in color intensity and smoothness can justify the investment for many artists.
Quick Comparison Table
To make the differences easier to understand at a glance, the table below summarizes the key characteristics of pencils and markers. This quick comparison highlights how each tool performs in terms of control, texture, color intensity, and overall usability.
| Feature | Pencils | Markers |
| Control | Highly adjustable, erasable | Bold, confident, permanent |
| Texture | Grainy, traditional, organic | Smooth, flat, modern |
| Color Intensity | Soft, buildable layers | Vibrant, saturated instantly |
| Ease for Beginners | Very beginner-friendly | Requires planning and confidence |
| Cost | Affordable, long-lasting | Higher cost, may dry out |
| Best For | Sketching, realism, drafts | Illustration, bold graphics |
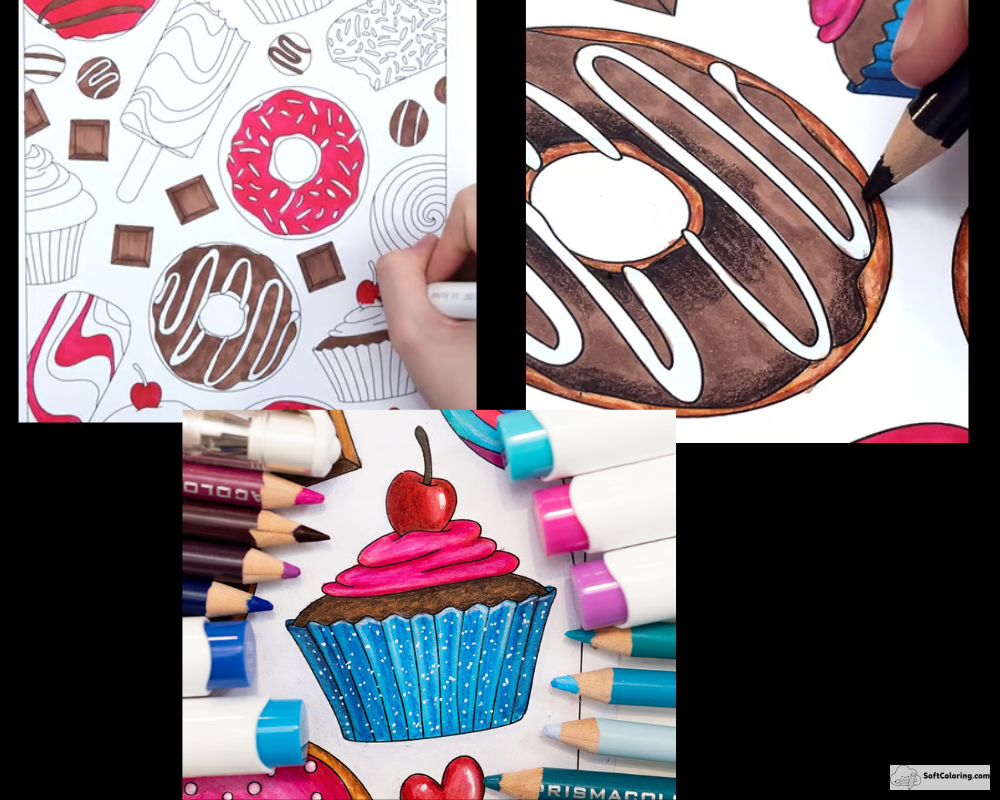
Mixed Media: Why Choose Only One?
In reality, many artists don’t choose between pencils and markers at all.
A common workflow starts with pencil sketching to establish composition, proportions, and light structure. Once the drawing feels balanced, markers are used to define line art and apply bold color layers. Some artists even return to pencils afterward to add subtle shadows or details on top of marker layers.
This mixed approach combines the flexibility of pencils with the vibrancy of markers. It allows for both precision and impact — structure and energy. Rather than thinking in terms of “either/or,” combining the two tools often produces the most dynamic results.
How to Draw With Colored Pencils and Markers (Together)
Below is a simple step-by-step process to help you use colored pencils and markers together effectively.
Step 1: Start With a Light Pencil Sketch
Begin with a very light sketch using a graphite pencil such as HB or 2H. Focus on establishing the basic shapes, proportions, and composition rather than adding heavy details.
Keep the lines soft and clean because markers are transparent and may lock dark graphite lines permanently under the ink. Many artists also use a kneaded eraser to gently lighten the sketch before moving on to coloring.
Step 2: Apply Marker Base Colors
Once your sketch is ready, start filling the main areas with markers. Think of markers as the base layer or underpainting of your illustration.
At this stage, focus on applying flat colors and covering larger areas evenly. It’s usually better to choose a shade slightly lighter than your intended final color, because it is easier to darken the drawing later with colored pencils than to lighten a marker layer.
Step 3: Build Depth With Marker Layers
After the first layer dries, you can add darker tones with markers to create basic shadows and form. Alcohol markers blend well when applied in layers, allowing you to create smooth transitions between colors.
Work gradually and avoid oversaturating the paper, as too much ink can cause bleeding or uneven textures.
Step 4: Add Details With Colored Pencils
When the marker ink is completely dry, switch to colored pencils to refine the drawing. This is where colored pencils really shine.
They can be used to:
- Blend edges between marker colors
- Deepen shadows and contrast
- Add textures such as hair, fabric, or wood grain
- Draw fine lines and small details
Because pencils interact with the paper texture, they help bring life and dimension to the smooth marker base.
Step 5: Enhance Highlights and Final Touches
To finish the artwork, you can add highlights and small accents. Since both markers and colored pencils are semi-transparent, bright highlights often require an additional tool.
Many artists use:
- white gel pens
- white acrylic markers
- or gouache
These are perfect for adding shine to eyes, reflective surfaces, or small light details that make the drawing feel more dynamic.
Helpful Tip: Markers First, Pencils Second
A common guideline when mixing these two media is to apply markers before colored pencils. Marker ink is fluid, while colored pencils contain wax or oil that can create a slight barrier on the paper surface. If pencils are applied first, marker ink may not blend smoothly and can even damage the marker tip.
Following the order sketch → markers → colored pencils helps achieve the cleanest and most controlled results.
Both pencils and markers bring their own strengths to the creative process, and the best choice often depends on your artistic goals, preferred style, and workflow. Ultimately, understanding how each medium works will help you choose the right tool for every project in the ongoing comparison of Pencils vs Markers.

